Building a new house in Palo Alto

Building a new house in Palo Alto

Wednesday, June 19, 2013

The Old is New Again: The story of our reclaimed Redwood house features

My favorite features of our new house are the old parts of it.


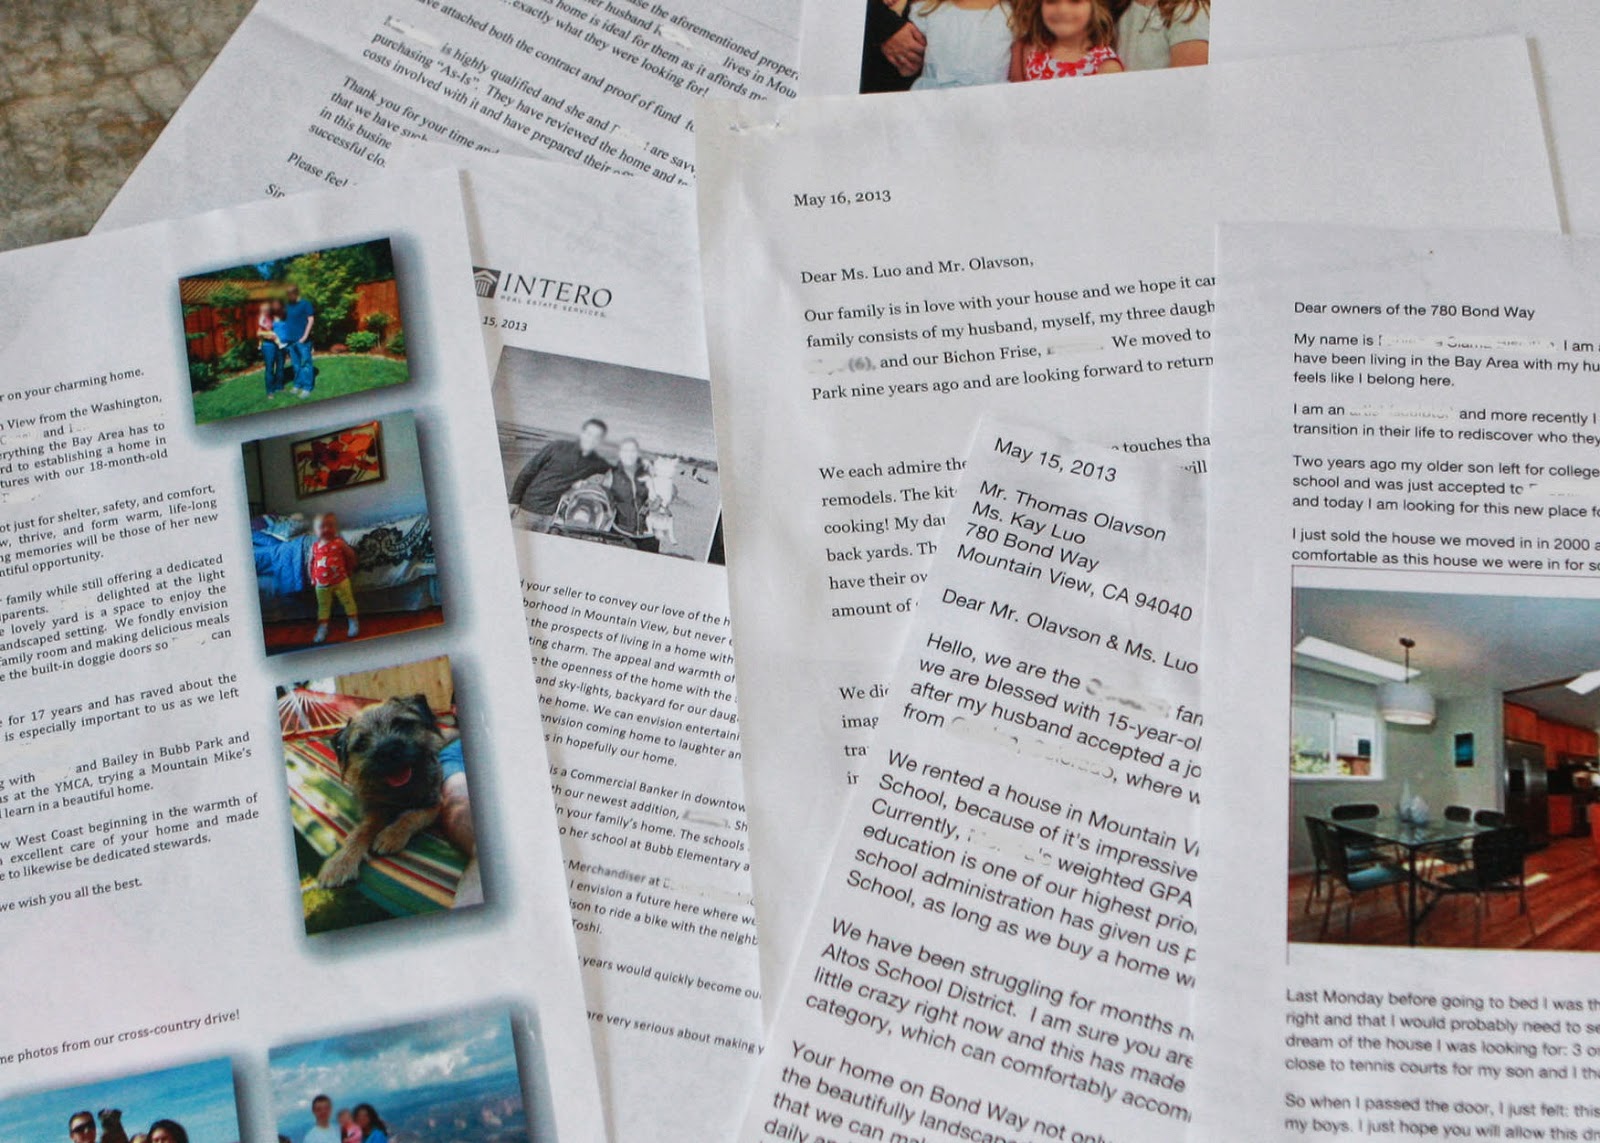
The day our offer was accepted for our Palo Alto property I had to drop off a deposit check at the selling agent's office. The owner of the house happened to be there so the agent asked me to come in and meet her. I was a little nervous because conventional real estate wisdom says that buyers and sellers should never meet lest someone says something that makes the deal go south.

"So, you love the house right?" the owner asked earnestly.

"Yes, we love the neighborhood...and the trees...and the parks and open space...and the fact that you can walk to all the schools," I gushed, trying not to blow the deal. Indeed those were all things that we loved about the house--everything but the house itself. I rarely fall in love with a house until I make it my own, plus we were planning on rebuilding part or all of it, so I wasn't personally attached to the structure. Needless to say the deal went through but her question made me reflect on the sanctity of a well-loved home.

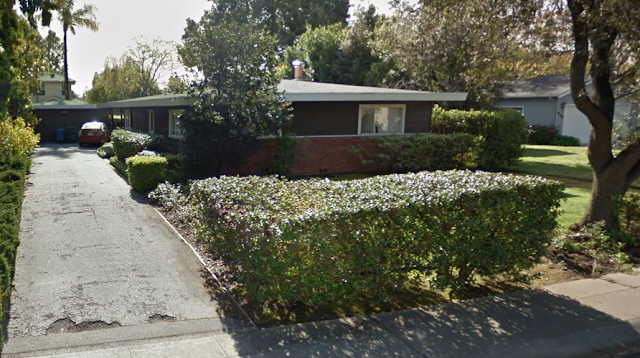
The original house built in 1952 as part of a new development. (Photo via Google Maps).

The Deconstruction
While navigating bidding strategies, multiple offers and nearly non-existent inventory it's easy to forget that the piece of property you're fighting over was someone's home. Our seller and her siblings had grown up in this house and it stored a lifetime of memories. Knowing this, the thought of bulldozing down and disposing someone's childhood home seemed disrespectful and flat out wrong.

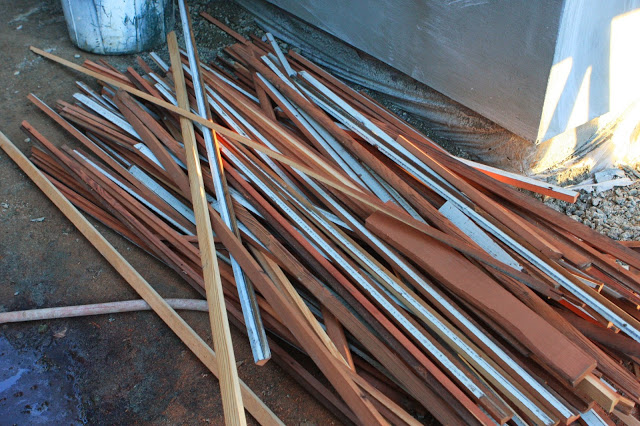
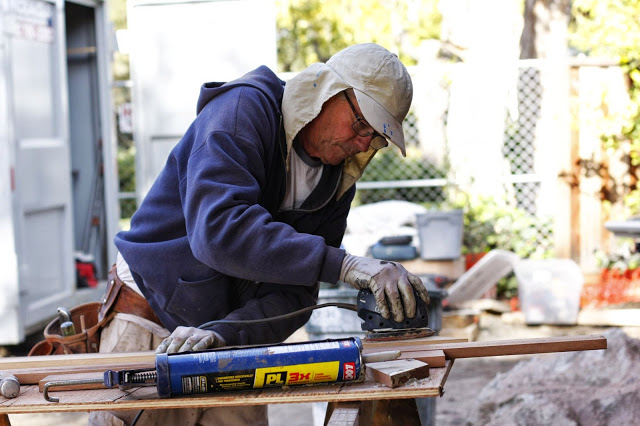
After much research we decided to deconstruct the house. Instead of doing a demolition and taking the debris to the dump, we hired Rebuild Green to painstakingly dismantle the house piece by piece, board by board to reuse and recycle everything and anything that could have another life.
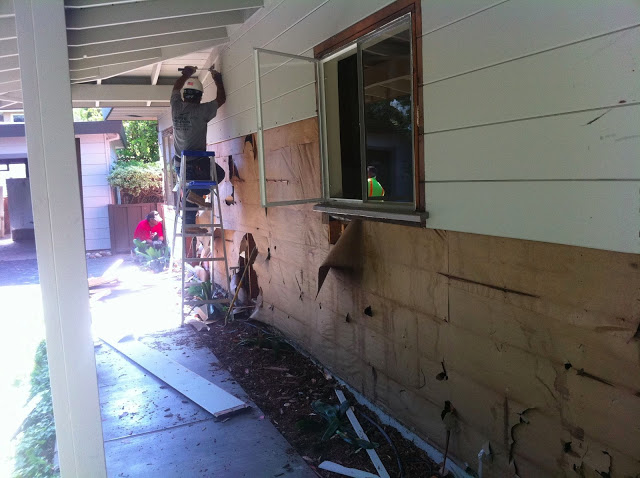
Deconstructing the original house and saving the redwood siding to be reused.


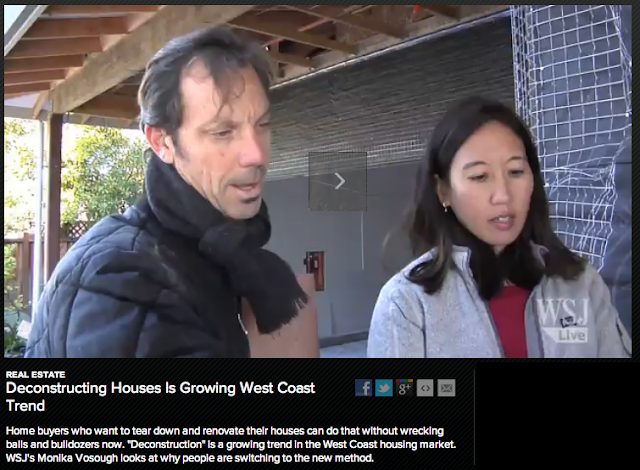
Here's a Wall Street Journal video about deconstruction starring Rod Cooper, James Witt & yours truly.


Old lumber is better than new
Living in Silicon Valley—the techno capital of the world—where iPhone models become obsolete in a year and cars will soon be driving themselves, we often assume that new is better. When it comes to wood, this is not always the case. While gathering quotes from deconstruction specialists, the one part of the house that had everyone drooling was the 1950's redwood siding. Lumber used back then was not farmed, it was harvested from our once abundant forests. Nowadays the only place you can find wood like that is in our protected national parks.

Today's farmed lumber is manufactured from fast-growing commercial plantations where trees are cut young and dried in kilns. Naturally aged wood is dense with tight rings and low moisture content which makes it rot resistent and reduces the tendency to shrink and pull apart. Here's a photo from a great blog post about reclaimed lumber:
"Below is a cross section of two 2x4s. The one on the left is over 100 years old. The other on the right is about 5 years old. Both of these are pine. The old lumber has very tight and dense rings. The new lumber on the right has broad rings. Today's lumber is grown on tree farms where the trees are given growth hormones. Old growth trees took 100 years to reach maturity. Today's trees are ready to harvest in 20." [Source: Ogden Insights]
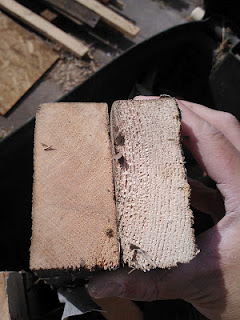
Old vs young lumber.
Building with reclaimed wood
We decided we wanted to incorporate the redwood siding from the old house into our new one so our general contractor brought in master carpenter, Charles Dubois, to help design something special. Working with reclaimed wood requires extra patience, ingenuity and an artisan's attitude. It's not something that you want a run of the mill production line crew hammering through. Charles spent his childhood on construction sites, picking up loose nails for a penny and learning the art of carpentry from his builder dad, Jim. The two now team up to run their family construction business building homes and taking on specialty projects like ours. Speaking of old becoming new again, I've found that many of the best trade people come from families who have been doing it for decades. Knowledge and skills get passed down and age-old techniques are refined and "reclaimed" by each new generation. 

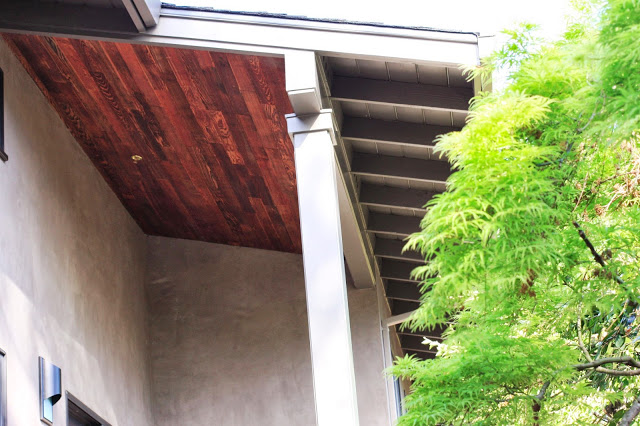
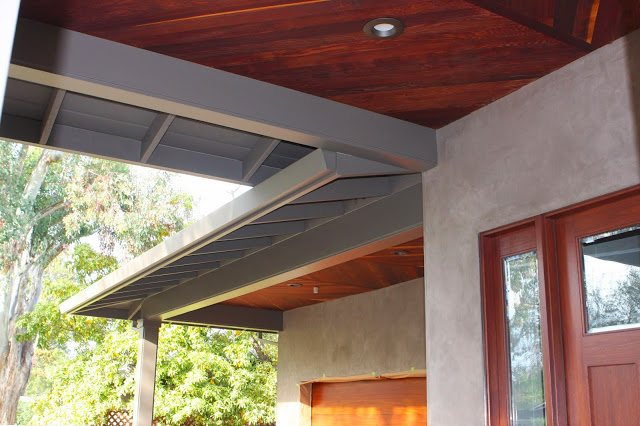
Below is a photo documentary of all the steps (there were many!) involved in reclaiming our redwood siding and transforming it into beautiful details throughout our house. To keep it low maintenance, we mainly put it in areas that don't get a lot of exposure to the sun and rain. We started with porch ceilings.

Prep
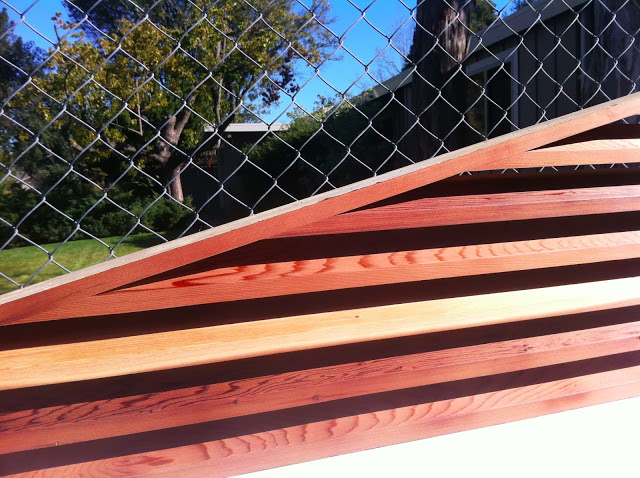
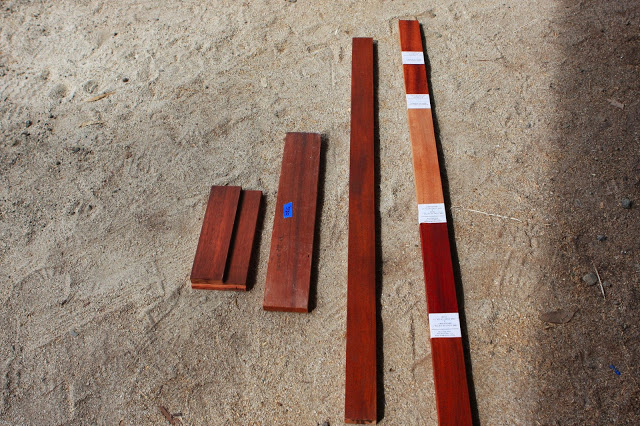
Instead of stripping the paint from the front of the siding, we used the backside which hadn't seen the light of day in over 60 years and was still in great condition. Mature redwood is naturally rot and pest resistant so holds up well over time.

Some of the siding was a little rough around the edges or stained from the tar paper so Charles ran each piece through a planer a few times to clean them up and make them smooth. Rebuild Green's dream team did a great job de-nailing the lumber. The siding was completely free of metal. It's important to inspect reclaimed wood because a single stray nail can ruin a saw blade.


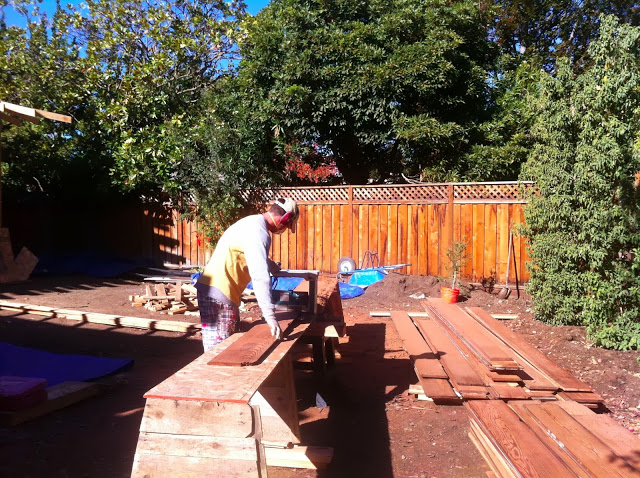
Originally 1"x8" lap siding, Charles and Jim used a 200-pound workshop saw to cut the pieces down to size and remove the lapped edges. Each board had a natural shape to it, many were bowed or wonky, so they devised a 12-foot long table saw fence using a few pieces of white trim stacked together and clamped to the saw. This served as a guide for the saw so that they could cut perfectly straight edges (without the guide, the saw would've followed the curvature of each board).


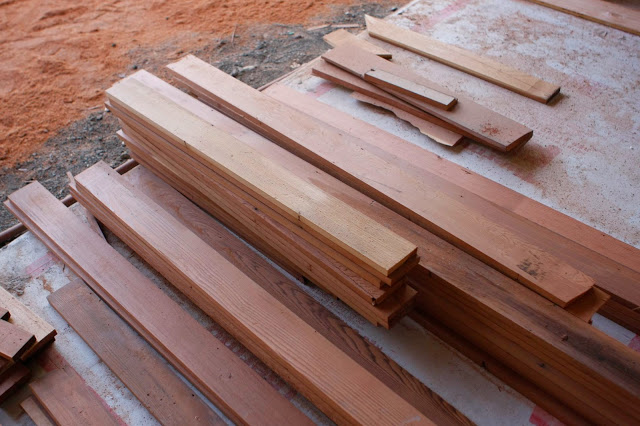
They decided on 3 1/2 inch wide planks since they could cut two pieces out of every 8 inch wide board. More precious, precious wood...


and minimal waste!


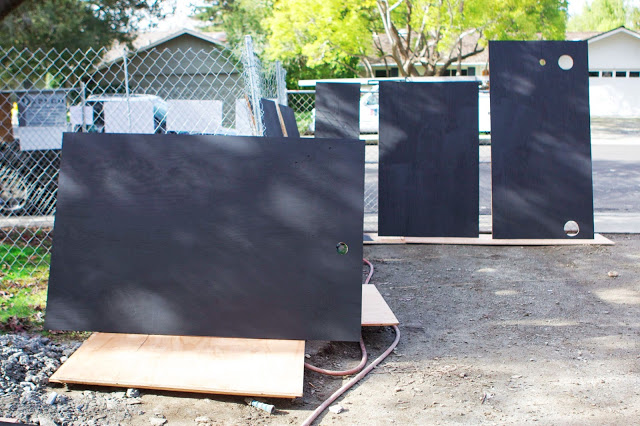
Charles created plywood cut-outs in the size of each porch ceiling and painted them black.  He mounted these to the ceiling as a backing material so that he could nail boards into any part of the ceiling. He painted them black so that if any of the boards shrank over time, the gaps would be less noticeable.


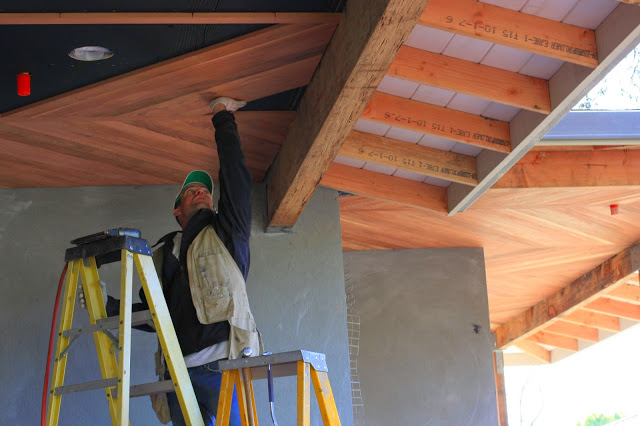
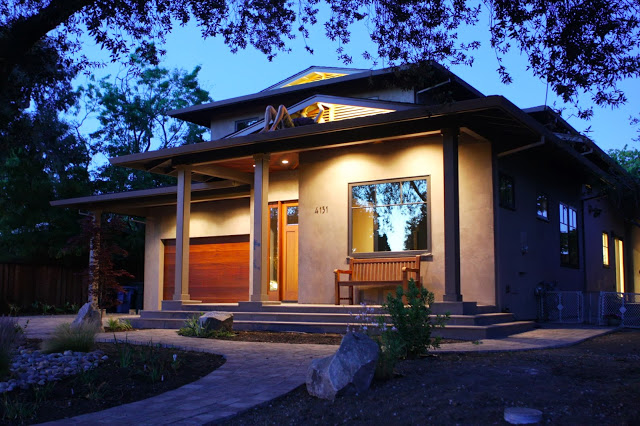
Our chevron front porch ceilings
Since, thanks to too many hours browsing photos on Houzz, I am obsessed with chevron patterns, Charles designed a porch ceiling with perfectly proportioned zig-zag panels. By the way, he calls it herringbone, I call it chevron...apparently, there is a difference between the two. To keep it from being too busy, Charles suggested we add a straight  board between each zig and zag panel. I was skeptical at first but then really liked how it turned out.


His dad Jim cut an angle into each board end, used a hand sander for final smoothing, and then applied glue to the back of each piece before handing it off to Charles to mount. The boards are held in place with glue, as well as nails. Working together, they were able to get a beautifully tight, precise fit with no gaps. If you look closely you can see black marks from the original nail holes but this is considered part of the beauty and authenticity of reclaimed wood.


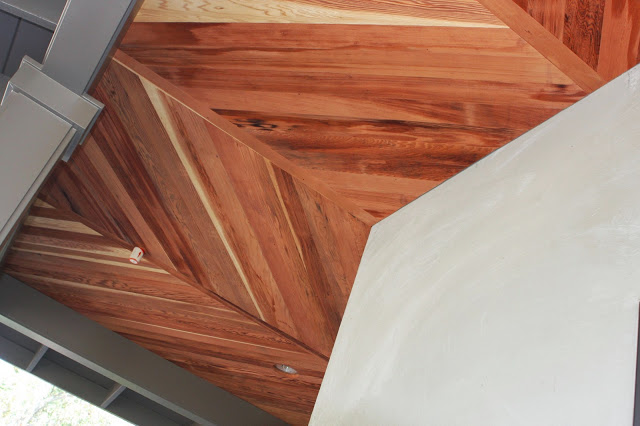
Charles was very fussy not only about the layout but the composition, as well. He mixed a combination of light and dark pieces to show off the wood's character and rich patina.


A simple mosaic porch ceiling
We did the front porches in the chevron pattern but mixed it up for the side porch (aka the dogs' yard) with a simple mosaic.


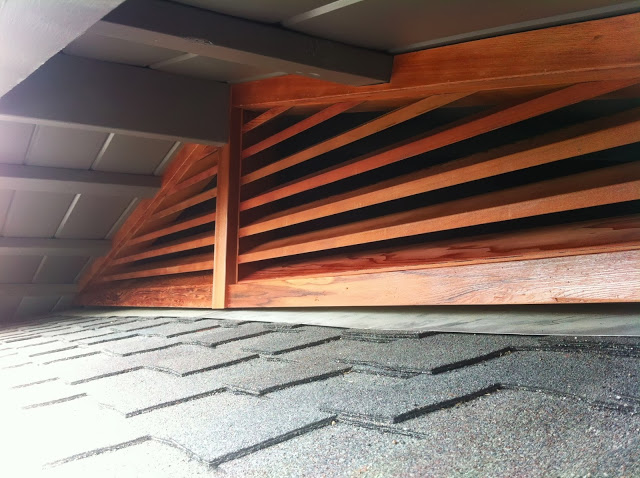
Turning exposed beams into architectural eye candy
Next we moved to the interior. We decided to turn a structural necessity—the beams in our downstairs flex room (aka the guest wing for our parents) into a feature.


Charles and his dad boxed out the exposed beams with black plywood then wrapped it with our pretty reclaimed redwood.


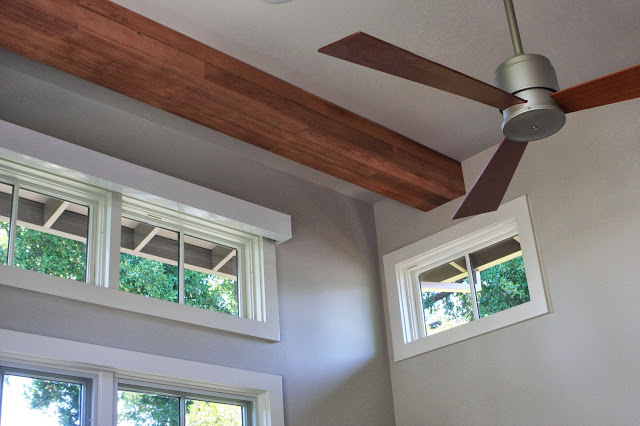
----  Et voilà! C'est magnifique non? I managed to find a chic ceiling fan that perfectly matches the redwood.


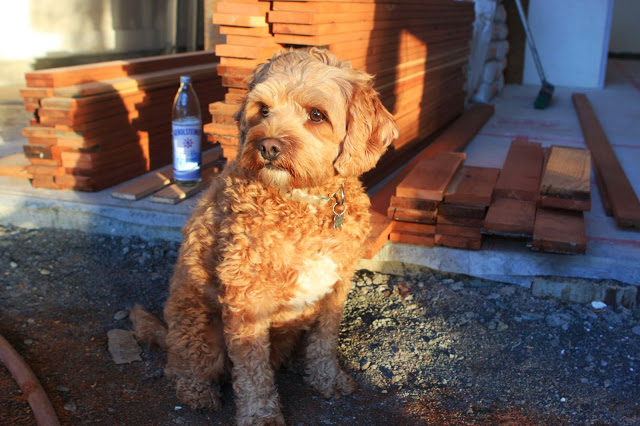
Obligatory dog photo
At this point, I started looking for any excuse to incorporate more reclaimed redwood into our house. After all, I was falling in love with everything Charles and Jim designed with it. Plus, the color matches Astro's fur (unlike our stucco), what's not to love about that?

The pièce de résistance...gable covers!
We were originally going to just buy boring off-the-shelf metal gable covers but decided it'd be the perfect place to work in something custom...like a couple of cherries on the top of our house.

These required extra ingenuity since Charles had to make 14 degree and 63 degree cuts in the wood so that the joint where the "veins" come together would be perfectly tight. Standard tools max out at 45 degrees so he had to get creative with a table saw set-up and a radial arm saw. He tried explaining the process to me but it went way over my head. While I can't appreciate the mechanics of what went into building them, I was awestruck by the sheer beauty of his creation.


In building the trim around the gable covers, Charles left the reveal (where the veins come together) uncovered.  It's a small detail but a sign of Charles' craft-above-all design philosophy. It would've been easy to hide sloppy cuts behind a piece of trim and from 30 feet below certainly no one will notice the difference, but that's not how Charles rolls.  


Making everything matchy-matchy
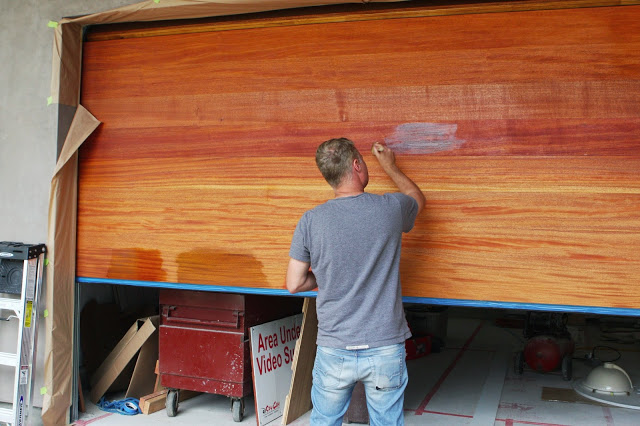
One of the final steps was to tie all the different wood elements together. Our garage door is African Mahogany (from Garage Doors, Inc.) and our front door is made out of a renewable wood called Lyptus (from Pioneer Millwork).  We wanted both doors to match the reclaimed redwood as closely as possible. 

If you're going to stain your garage and front doors, make sure you ask for extra wood samples when you order them. That way you can test different stains on them to find the best possible color.

Matching three different woods is not easy but our stain guy Dennis worked wonders. A good stain guy is worth his weight in gold because you don't get a second chance when it comes to staining wood.

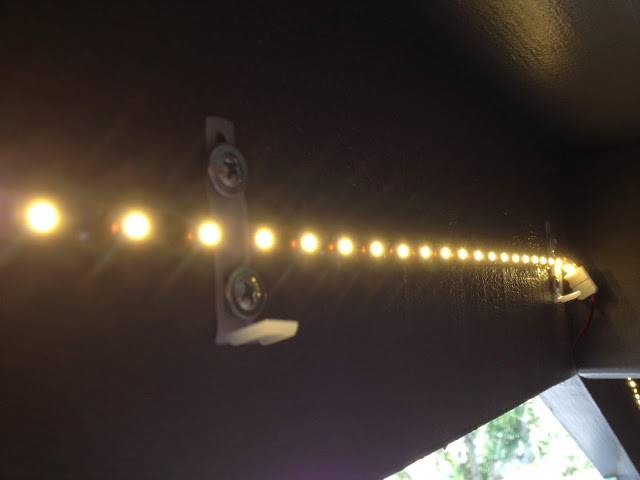
The magic of lighting
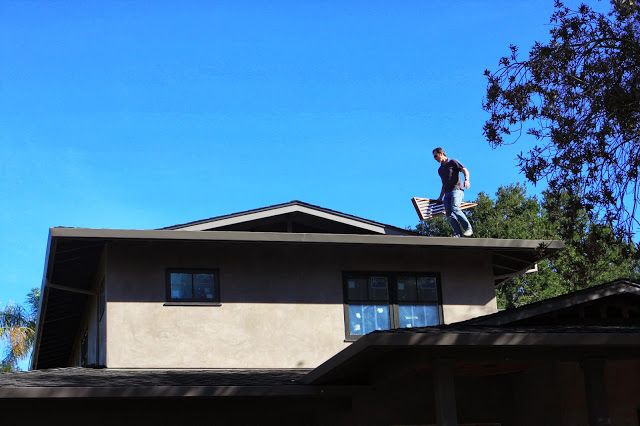
We had originally planned to just put recessed lights on the porch until Jeff and Charles came up with the brilliant idea to also light the gables. Our crafty electrician James, wired some no-frills LED ribbon lighting to the back of the gables' facia boards and the result was amazing. Well, amazing until later that night when the sticky backing gave out and we had what looked like a string of janky Christmas lights dangling from the gables. Duct tape works as a quick fix but if you want your lights to stay put for the long haul, be sure to put in brackets like the ones above.

Thomas on the roof duct-taping our LED strip lighting so I could get a good blog photo.

Friday, June 14, 2013

Sold! A behind the scenes look at the selling of our Mountain View home & tips for buying in a crazy market.


Kudos to our real estate agent, Erika Enos! Our house sold fast and for more than we were expecting.

This week we officially handed over the keys to the Cuesta Park Charmer. We are very happy that we found a nice new family to love the home and the process went relatively smoothly. Compared to the angst of being on the bidding side of the table being a seller is this market is a joyride. Here's how everything played out:

The Stats
List price:  $1,228,000
Sale price: $1,603,500 (~30% over asking), no contingencies, 25-day close

Open House visitors on Sat & Sun: ~150
Views of virtual tour: 8091 (32% of referring web pages came via HomeCrunch! vs. 26% via MLS)
Requests for disclosure package: 35
Offers: 10

3 offers with contingencies
3 all-cash offers
3 emailed offers (did not show up to present)
7 agents presented offers to us in person
6 personal letters from bidders

Breakdown of bids
1 at asking price
1 at 1.35M
4 at 1.4-1.5M
4 above 1.5M

Top 3 bidders made it to the "final round"

Deciding factors
We had two main criteria that we weighed when looking at offers:
1. Highest price
2. Risk of deal falling through

Lessons for buyers
Having been on the losing end of many a home, we found it fascinating being on the other side and learned a lot about the psychology of the market and what it takes to be a successful buyer. Some of the lessons were obvious, others took us by surprise and made me cringe when I thought back to some of the loser offers we had our agent present over the years. In general I'd say these lessons only apply to "hot" properties when you're competing with many other offers.

1. Contingencies are a non-starter
We had three offers with contingencies. One was a 5-day inspection contingency, one was a 10-day loan contingency, and the third was a 7-day appraisal and inspection contingency. We didn't give any of these offers a second thought because the uncertainty and risk of the deal falling through wasn't worth it to us, especially with seven other "clean" as-is offers on the table. We paid a reputable third party inspector to perform a report for our disclosure package so buyers would have an unbiased professional inspection to review. Asking for a loan contingency is like waving a red-flag saying you're not sure if you'll qualify for a loan.

2. More $$$ is better than all-cash 
There's a lot of hype right now and scary talk about needing an all-cash offer to win but as we learned this isn't the be all end all. The main advantage to an all-cash offer is certainty and a faster close. All things being equal, a cash offer is preferable because it reduces the risk that the buyer will have trouble getting financing. In addition, cash offers can close in a matter of days rather than weeks, so the seller gets their money sooner.

In our case we didn't have an urgent need for the cash or a fast close. (Side note: If you ever want an idea of what the sellers are looking for in a perfect offer, ask the seller's agent. Sometimes the agent will tell you whether cash/fast close is more valuable to their client or more money, or a rent-back, etc.) We didn't have a large mortgage left on the house so the carrying costs were less than $200/day. Since a fast close was worth less than a few thousand dollars to us, the only real advantage was increased certainty that the deal would happen.

Our highest all-cash offer was just over 1.5M and we had several significantly higher offers from bidders who were well qualified for loans. If it had been a difference of 10-30K we probably would've opted for (or countered) an all-cash buyer but above that we were definitely willing to wait and didn't bother asking the cash buyers to match the best offer. I've been told that in general, buyers in the Bay Area pay a premium of ~50K for the "privilege" of getting a loan.

3. Your agent can tip the scales
As part of the selling process, our real estate agent, Erika Enos and I listened to offers in person. Not all sellers do this. Some ask that you simply send in your written offers, but in our case I wanted to meet with the agents and hear why we should pick their clients. Numbers guy Thomas skipped the niceties and joined us after the meetings to deliberate. During these brief 10-15 minute presentations, I looked for clues about who would be the best buyer for our house. All of the agents were professional and courteous but I found myself gravitating towards some more than others. Despite what the WSJ says about attractive agents, I've always found the down-to-earth, friendly agents more likable and trustworthy than the polished, salesy ones. The three agents who submitted their offers via email missed an opportunity to make an impression on us and even though one of the offers was over 1.5M, we didn't know anything about the buyers and didn't include them in the final round.

Betsy Dwyer, the agent representing the winning bidders, did everything right. She let us know she had educated her clients so they had full knowledge of what they were purchasing and explained why they had a strong desire to own the property. She gave us a personal letter from them and told us why the house was perfect for their needs.  She even brought their loan agent to the meeting to assure us in person that they would have no problem getting a loan (in retrospect, a letter would've sufficed). Coincidentally, Betsy used to live around the block from us in Cuesta Park so being familiar with her was a big plus. Her clients were not initially the highest bidder but we were rooting for them to win.

Since all the buyers said they'd be open to a counter, we went back to the top three bidders and gave them another chance to give their best price. We were glad when Betsy's clients came out on top and let them know they had won. Later when one of the other agents came back offering to beat the final price by another thousand dollars, we politely declined because we were confident that we had found the right buyers. Knowing that our agents would close the deal with both sides happy about the terms was more important to us than an additional thousand dollars. In the heat of the moment, it's easy to get caught up in a bidding war and the last thing we wanted was to wind up with a buyer who had regrets or felt like they had overpaid (buyers like these often back out or threaten lawsuits).
Puppy glamour shots, kids' GPAs (4.4 and 4.0!), family photos at our house...how can you say no?

4.  Show why you're a good fit
I have never written a letter to a seller, so I was surprised when most of the agents showed up with personal letters from their clients. I was even more surprised when I realized that they kind of work. Don't get me wrong, a heartfelt letter is not going to put you in the running when the other offers are 100K-200K higher (at least not with this seller) but if you have a competitive offer they do help create an understanding of why the seller should pick you. Even if it's not an emotional decision for the sellers, having additional context about the buyers can help make a case for why you will follow through with the deal and not back out.

Besides the fact that I'm a sucker for dog photos, knowing that a buyer is going to enjoy the nearby dog park and won't be upset about the doggy door that was artfully hidden from view by the stager, gave certain buyers a leg up (yes, pun intended). Other helpful details included background information on employment (our buyers both work nearby in Mountain View and are going to looove their commute), current living situation, what you are looking for and why, what you appreciate about the house, who will live in it, how you'll decide which of your twins will get the bigger bedroom, etc. Whether or not you write a letter, it is important that your agent presents a story about who you are, why the house is perfect for you and each of your family members. As a seller, it's reassuring to know that each and every family member is going to be happy with the house (grandparents and pooches included!)

Feature or a fix...can you spot the dog door? The perfect buyers will love the house after the staging is gone.

5. Play to win
This is a rule I've tried to violate many a time. While sitting through the presentation by the realtor whose clients were offering asking price along with an inspection contingency, I remembered how many times I wanted to half heartedly bid on a house hoping to get lucky and Erika had to tell me, "Sweetie, if you're not going to play to win, don't bother making an offer...it just drives up the price for everyone else." Her words finally made sense to me.

If you are serious about buying a particular house, research comps and have your agent keep tabs on how many offers there will likely be. A good agent checks in with the selling agent to find out how many disclosure packages have been requested and how many confirmed offers there are. Anytime there are more than a few offers on a house you shouldn't be in "get a deal mode"—you will need to put in an aggressive bid from the start or you won't get a chance to play for real. In this market getting a deal is getting a house. Since price is based on recent comps, in a rising market the next comparable house will likely cost more.

When there are more than three offers on a house there are usually two rounds—a first round that weeds out low bidders and a counter-offer round to select the ultimate winner. A good agent will have a sense of what it takes to be considered in the second round based on the number of offers there are (the more offers there are the more aggressive you have to be). When we bid on our Palo Alto house, our initial offer was strong enough that the sellers simply made us a 10K counter-offer and didn't include any of the other four bidders. In the case of our Mountain View house the top three bidders were close enough to each other that we gave them all another chance to bid. In the end, the final offer we accepted was about 25K higher than the highest bid in the first round.

Hopefully these observations will help would-be buyers out there. Whenever we've won or lost a bid on a house I've always wondered what went on behind the scenes in the deliberation room. So here you have it, this is what happened in ours...

Behind the scenes strategery: Erika explaining the pros & cons of each offer while Thomas plots out
price vs risk models and Kay plans her next blog post.